Walkthrough
Go over all Acton facilities in a single project made from a built-in template
This guide covers the full Acton workflow: creating a counter contract from a template, compiling it, linting and formatting code, running tests with coverage and mutation analysis, setting up a wallet, deploying to testnet, and verifying the source.
Prerequisites
- Acton 1.1.0 or later installed.
- Node.js 22 or later LTS: required for the TypeScript app scaffold added by
--app.
To enable Acton support in the IDE, install either of:
To enhance agentic workflows, install Acton development skills.
Initialize a new project
Finished the quickstart? Skip the project creation step and continue reading this guide.
Use acton new to create a new project directory from a built-in template:
- The
countertemplate ships with a ready-made contract, tests, and a deployment script. - The
--appflag adds a Vite-based React frontend scaffold and generated TypeScript wrappers alongside the Tolk sources.
acton new first_counter --template counter --appOutput:
$ acton new first_counter --template counter --app
  Installing standard library v1.1.0
> Initialized empty Git repository in /home/you/first_counter/.git/
✓ Created new Acton project
  Project name: first_counter
  Description: A TON blockchain project
  Template: counter
  TypeScript app: included
  License: MIT

Created Acton.toml with project configuration
Pass --hooks to install pre-commit checks, or --agents to add coding-agent guidance. See acton new for all options. When run without arguments, acton new prompts interactively.
Navigate to the project folder:
cd first_counterWith --app, the project layout places Tolk sources under contracts/src/, tests under contracts/tests/, and scripts under contracts/scripts/. Generated TypeScript wrappers go into wrappers-ts/, and the React frontend lives in app/.
Install the NPM workspace dependencies before running any frontend commands:
npm ciThe generated Acton.toml includes ready-to-run script aliases deploy-emulation and deploy-testnet. Start with local emulation; it does not require a wallet, a network connection, or testnet funds.
acton run deploy-emulationIf acton wallet is already configured, the contract can be deployed to testnet immediately.
acton run deploy-testnetOutput:
$ acton run deploy-testnet
acton script contracts/scripts/deploy.tolk --net testnet
Awaiting trace... [Attempt 1/20]
Trace settled with 2 transaction(s)
N/A -> external
└── ext-in 0x7369676e -> EQD36X..ur8XSS A      gas=4939
    └── empty 0.005 GRAM -> EQBoxX..16Bfkg B    gas=692

Deployed counter to kQD...tVe (Counter)
Counter owner is kQB...iD (deployer)
Counter value is 0
Build the contract
Use acton build to compile every contract configured in Acton.toml and place build artifacts in build/ folder:
acton buildOutput:
$ acton build
   Compiling contracts
   Compiling Counter
    Finished in 4.8ms
    Finished in 728.8µs
Each compiled contract produces a JSON artifact:
{
  "code_boc64": "te6ccgEBBwEA1gABFP8A9KQT9Lzy...",
  "hash": "15407004A66E0CF95A67C39EDBB54A531DFDB6DF93FB7D365FAE57A34B874747"
}
Build a single contract by name:
acton build CounterPass --info to print artifact details, or --clear-cache to discard cached artifacts and recompile from scratch. See acton build for all options.
Print artifact details and resolved build output:
acton build --infoOutput:
$ acton build --info
   Compiling contracts
    Finished in 2.7ms

   Artifacts of Counter
        Code te6ccgEBBwEA1gABFP8A9KQT9LzyyAsBAgFiAgMB+ND4...
        Hash 0x15407004A66E0CF95A67C39EDBB54A531DFDB6DF93FB7D365FAE57A34B874747
See the building guides for more.
Format Tolk files
Use acton fmt to format all .tolk files under the project root using the built-in Tolk formatter:
acton fmtOutput:
$ acton fmt
All files are already formatted
Run in check mode to detect formatting violations without rewriting files:
acton fmt --checkWhen a file is not formatted correctly, --check prints a unified diff and exits with a non-zero status:
$ acton fmt --check
Diff in contracts/src/Counter.tolk:
-fun onInternalMessage(in:InMessage){
-val x=1;
+fun onInternalMessage(in: InMessage) {
+    val x = 1;
     val y = 2;
 }
Format a specific file or directory:
acton fmt contracts/src/Counter.tolkSee the formatting guide for more.
Lint contracts
Use acton check to run the Tolk linter across the whole project and report diagnostics:
acton checkOn a clean project, it prints the checked targets and exits with status 0:
$ acton check
    Checking Counter
    Checking contracts/scripts/deploy.tolk
    Checking contracts/tests/counter.test.tolk
When issues are found, output looks like this:
$ acton check
warning[E001]: variable `x` is unused
  --> contracts/src/Counter.tolk:12:9
   |
12 |     val x = 1;
   |         ^ help: prefix with `_` to silence

1 issue can be fixed automatically, rerun with --fix flag.

Use acton check --explain <CODE> to get detailed explanation of a rule.
For example: acton check --explain E001
Check a specific contract by name or file path:
acton check CounterSee the linting guide for more.
Regenerate wrappers
Wrappers are auto-generated from the contract ABI, so regenerate them whenever the ABI changes. Store wrappers in VCS along with the contract sources.
Wrappers for tests and scripts
Use acton wrapper to generate typed Tolk wrappers from the contract's compiler ABI. A prior acton build run is not required.
Regenerate wrappers for every contract at once:
acton wrapper --allOutput:
$ acton wrapper --all
   Generated contracts/wrappers/Counter.gen.tolk
Generate the wrapper for a single contract:
acton wrapper CounterWrappers for dApp integration
Pass --ts to emit a TypeScript wrapper instead, which the app template consumes from wrappers-ts/:
acton wrapper Counter --ts$ acton wrapper Counter --ts
Generated wrappers-ts/Counter.gen.tsSee the dApp development guide for more information about using TypeScript wrappers.
Test the contract
The template includes several tests for the counter contract. Use acton test to discover and run all test files matching *.test.tolk:
acton testOutput:
$ acton test
   Compiling contracts
    Finished in 726.375µs
     Running tests

 TEST  <root>/first_counter

 > contracts/tests/counter.test.tolk (8 tests)
  ✓ deploy exposes initial owner 4ms
  ✓ increase counter 4ms
  ✓ reset counter 3ms
  ✓ decrease counter 4ms
  ✓ decrease counter fails on underflow 3ms
  ✓ decrease counter fails on overflow 3ms
  ✓ non-owner cannot change counter 3ms
  ✓ unknown message 2ms

 ✓ 8 passed in 1 file
Other useful acton test flags include:
| Flag | Purpose |
|---|---|
--filter <regex> | Run only tests whose name matches the regular expression |
--fail-fast | Stop after the first failure |
--save-test-trace | Write TVM execution traces to build/traces/ |
See the testing guides for more.
Collect coverage
Pass --coverage to collect line and branch coverage and print a summary after the run:
acton test --coverageSet a minimum threshold to fail CI when coverage drops below a target:
acton test --coverage --coverage-minimum-percent 80Inspect results in the browser UI
Pass --ui to open an interactive browser interface called Test UI. Combine it with --coverage to browse annotated source files in the Coverage tab:
acton test --ui --coverageFilter tests and inspect the traces:
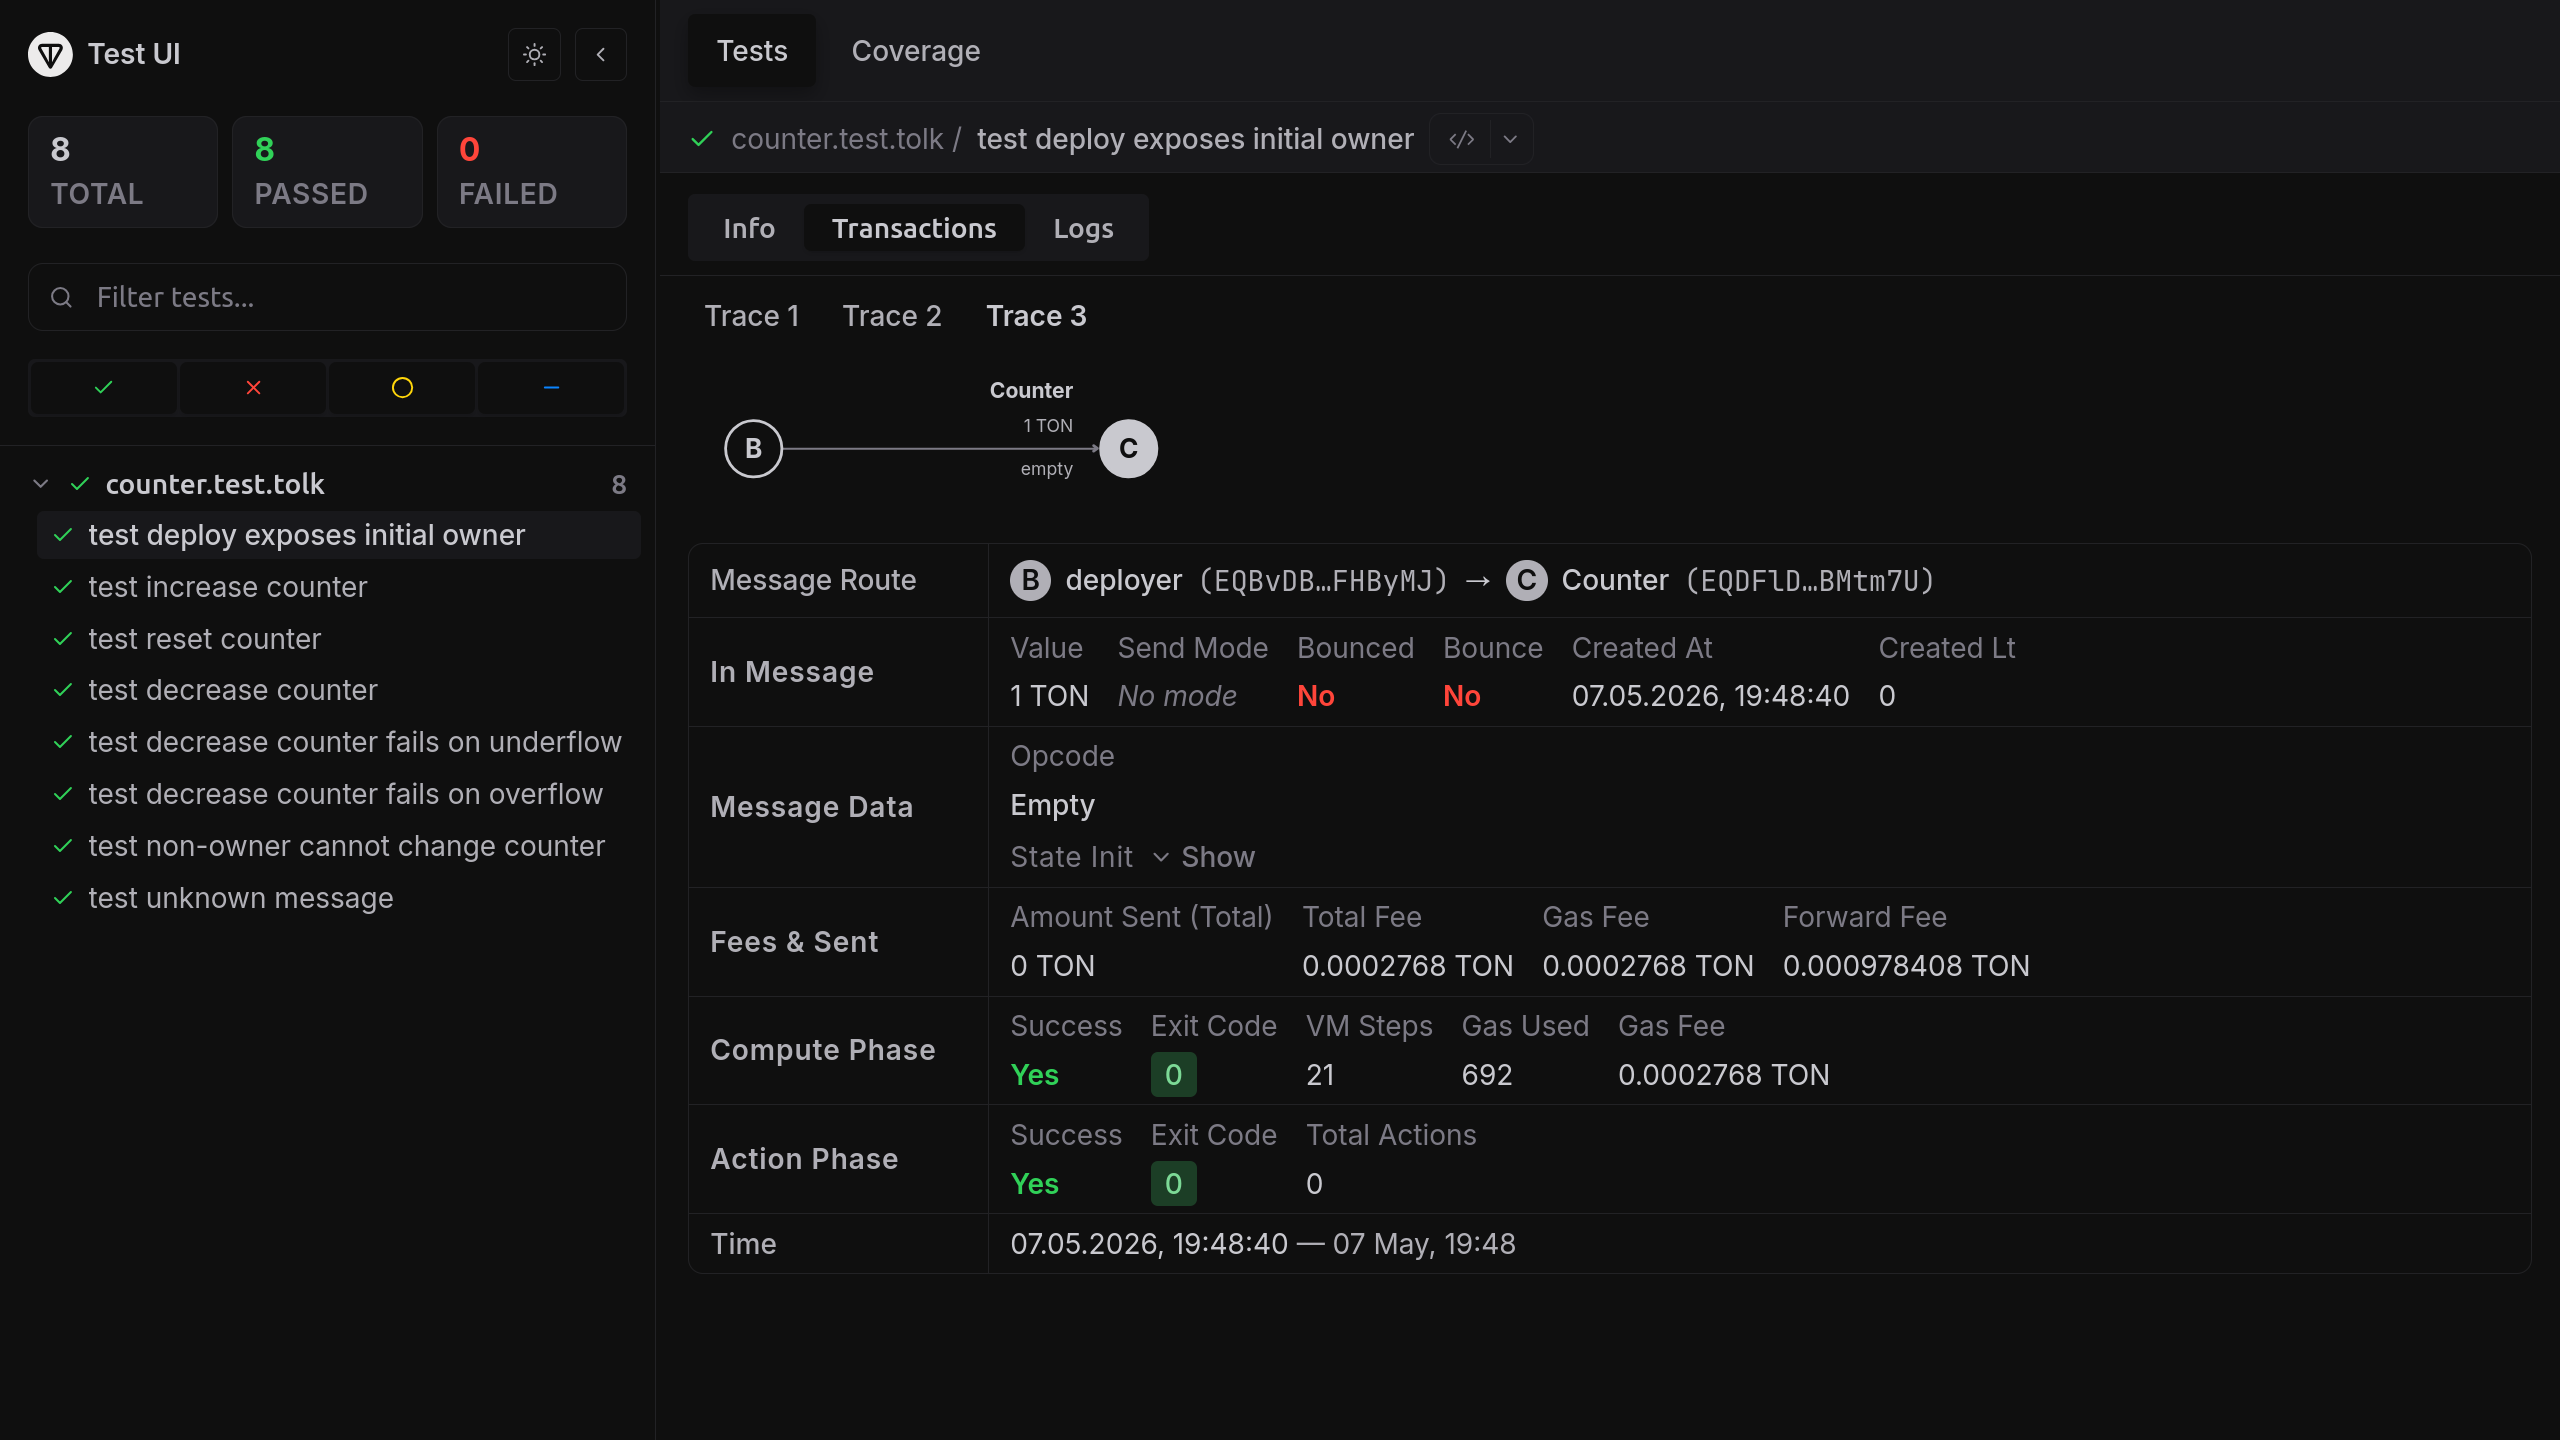
Inspect the coverage:

Run mutation testing
Coverage shows which lines ran — not whether the tests would catch a bug on those lines. Mutation testing fills the gap: it makes small, deliberate changes to the contract — for example, replacing += 1 with -= 1 or removing an assert — and reruns the suite. If every test still passes against a mutation, that mutation is a survivor — the line is exercised but its behavior is not actually verified.
Use --mutate-contract to restrict mutations to a single contract:
acton test --mutate --mutate-contract CounterOutput:
$ acton test --mutate --mutate-contract Counter

Mutation Testing
────────────────────────────────────────────────────────────
Session:  ace2c3aae5a827a2
Contract: Counter
Source:   contracts/src/Counter.tolk
Files:    1
Mutants:  6

  ◉ Mutation 1/6 contracts/src/Counter.tolk:18 Replace == with != KILLED
  ◉ Mutation 2/6 contracts/src/Counter.tolk:22 Replace `+=` with `-=` KILLED
  ◉ Mutation 3/6 contracts/src/Counter.tolk:27 Replace >= with > SURVIVED
  ◉ Mutation 4/6 contracts/src/Counter.tolk:28 Replace `true` with `false` KILLED
  ◉ Mutation 5/6 contracts/src/Counter.tolk:30 Remove assert statements KILLED
  ◉ Mutation 6/6 contracts/src/Counter.tolk:33 Remove throw keyword KILLED

    Total mutants        6
  ✓ Killed               5
  ✗ Survived             1
  ! Compile errors       0

  ◆ Mutation Score       83.3%

Survived Mutants
────────────────────────────────────────────────────────────

  ✗ Mutation #3
  Rule:  Replace >= with > [replace_greater_or_equal_with_greater_than]
  at contracts/src/Counter.tolk:27

Diff in contracts/src/Counter.tolk:
             assert (storage.owner == in.senderAddress) throw Errors.NotOwner;
-            assert (storage.counter >= msg.decreaseBy) throw Errors.CounterUnderflow;
+            assert (storage.counter > msg.decreaseBy) throw Errors.CounterUnderflow;
Each survivor pinpoints a specific line, rule, and diff. Add a test that exercises the corresponding path and rerun — the mutation will be killed on the next run.
Use --mutation-diff branch to test only mutations on lines changed since the merge base — useful in CI to skip re-testing stable code. See the mutation testing docs for details.
Debug the contract
Exception tracing
To quickly identify where an exception occurred, pass --backtrace full to get source locations for a failure without stepping through:
acton test --backtrace fullThe clean counter template passes. The output below shows the kind of source locations Acton prints when a test fails:
$ acton test --backtrace full
   Compiling contracts
   Compiling Counter
    Finished in 5.1ms
    Finished in 731.2µs
     Running tests

 TEST  /home/you/first_counter

 > contracts/tests/counter.test.tolk (2 tests)
  ✗ increase counter 12ms
    └─ Error: expect(actual).toHaveSuccessfulTx(expected)
        N/A -> deployer A
        └── IncreaseCounter 0.1 GRAM -> Counter B           gas=1513 exit_code=10 aborted
            ├── Compute phase failed: Dictionary error
            └── at contracts/src/Counter.tolk:42
                   onInternalMessage   at contracts/src/Counter.tolk:18

        Cannot find transaction from deployer A EQBvDB..FHByMJ to Counter B EQANZp..QQ5GsV
        with:
          success=true
          exit_code=0
      └─ at contracts/tests/counter.test.tolk:24
  ✓ reset counter 4ms

 ✓ 1 passed, ✗ 1 failed in 1 file

Some tests failed.
Source-level debugging
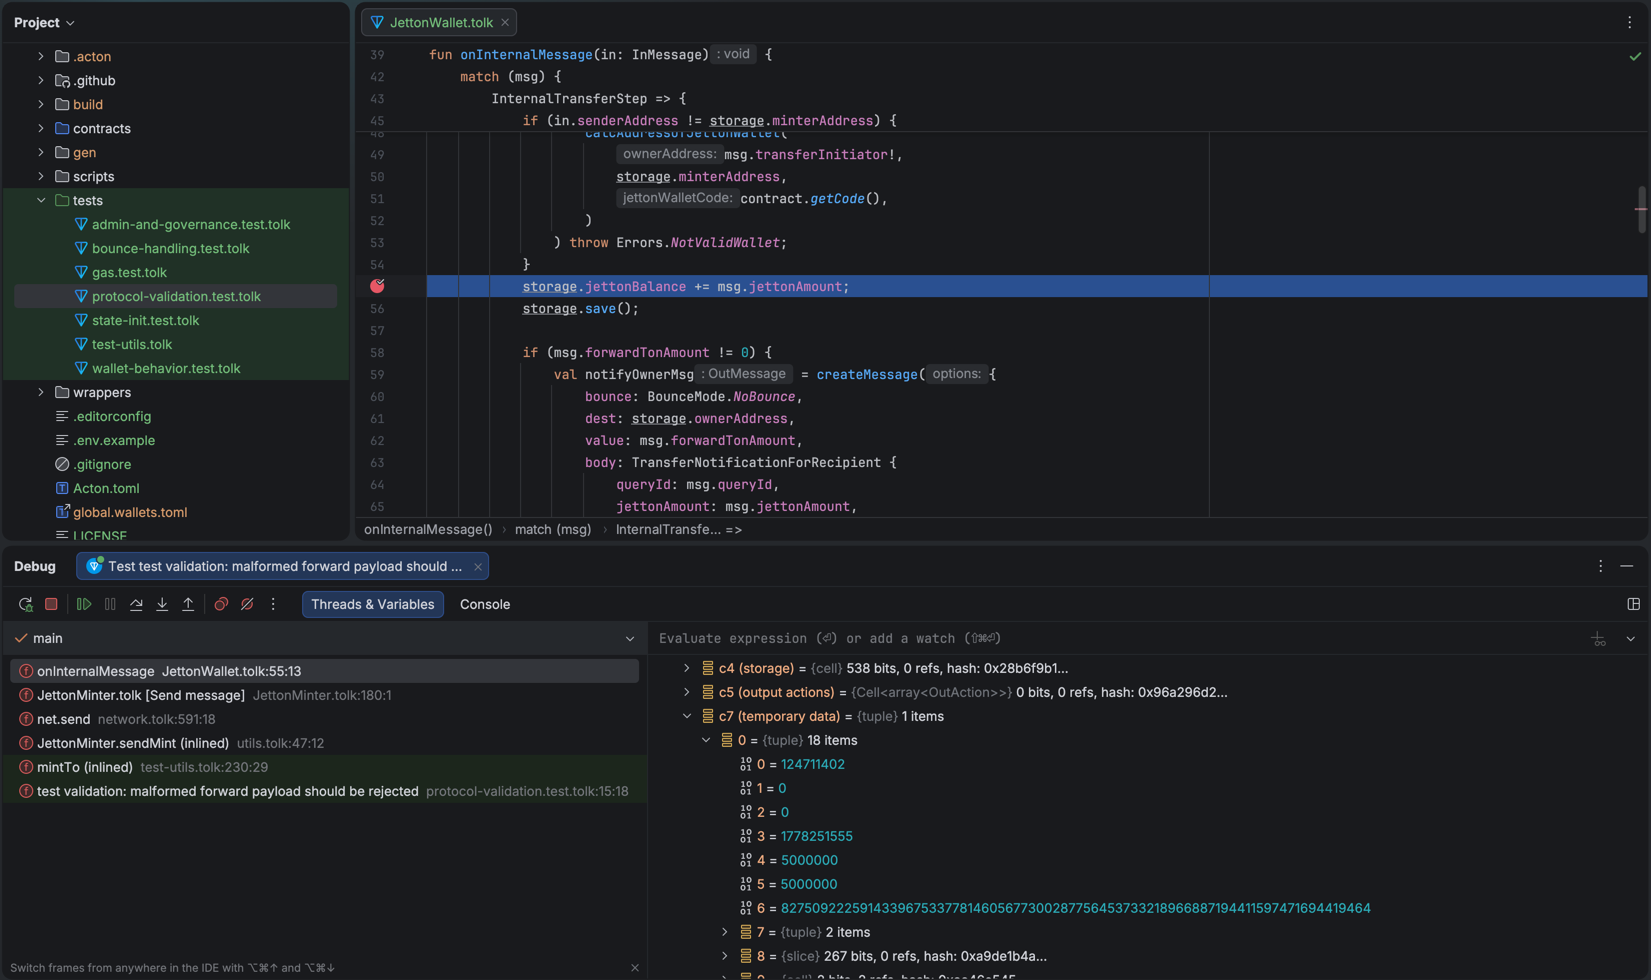
For cases where simple error tracing is not enough, Acton ships a source-level debugger that uses the Debug Adapter Protocol (DAP). It runs the same contract code as production without a separate debug build.
It provides the expected source-level debugging features:
- variables: see every local at the current frame and watch how its value changes between steps.
- lazy objects:
lazyvalues are inspectable even when their fields have not been loaded from storage yet. - stepping: step over, step into, and step out, including across inlined function boundaries.
- breakpoints: set source breakpoints or use Run to cursor to advance to a chosen line.
- exception breaks: stop automatically when an uncaught exception is thrown.
The --debug flag is available on three commands:
| Command | What gets debugged |
|---|---|
acton test [path...] --debug | A live local test session for one or more files/directories — combine with --filter to narrow down to one test |
acton script <path> --debug | A locally executing script |
acton retrace <HASH> --contract <NAME> --debug | Debug a real on-chain transaction |
See the debugging guide for more.
Start a debug session from the editor
Acton works best with the TON VS Code extension and the TON JetBrains plugin, which ship a Tolk debug adapter type out of the box. Other DAP clients are also supported.
JetBrains IDEs
Open a *.test.tolk file and use the run-configuration Debug button. The plugin starts Acton with --debug and attaches automatically: additional launch configuration is not required.
VS Code
To start the test run from the editor, right-click a test inside a *.test.tolk file and pick Debug Test — the TON extension launches an Acton instance with --debug and attaches in one step.
To attach to a running Acton session, start Acton with --debug on a fixed --debug-port:
acton test contracts/tests/counter.test.tolk --filter "increase counter" --debug --debug-port 4711Output:
$ acton test contracts/tests/counter.test.tolk --filter "increase counter" --debug --debug-port 4711
  Compiling contracts
   Finished in 6.2ms
    Running tests

 TEST  /home/you/first_counter

Debugger server listening on 127.0.0.1:4711
 > contracts/tests/counter.test.tolk (1 test)
Acton blocks the selected test until a client attaches. Add the following to .vscode/launch.json:
{
 "version": "1.1.0",
 "configurations": [
   {
     "type": "tolk",
     "request": "launch",
     "name": "Attach to Acton debug session",
     "debugServer": 4711
   }
 ]
}
Once the terminal shows Debugger server listening on 127.0.0.1:4711, open the Run and Debug panel, pick Attach to Acton debug session from the configuration dropdown, and run it. VS Code connects to the listening port and the test launches under the debugger.
The same configuration works for acton script --debug and acton retrace --debug — match the --debug-port value with the debugServer option.
With the editor attached, set breakpoints in .tolk sources, and step through code as the test runs.
Any DAP client
To attach other DAP clients, run acton test with --debug on a fixed --debug-port and point to it in the client configuration.
Run scripts
There is no dedicated acton deploy command. Instead, contracts are deployed using Tolk scripts.
Use acton script to deploy contracts on a real network and interact with them. Tolk scripts can also run in the same local emulation environment as tests.
Script emulation is useful for checking contract address derivation, initial state, deployment statuses, and post-deploy getter calls before deploying contracts to a public network.
See the scripting guides for more.
For example, add a new script to the contracts/scripts/ folder to deploy the counter and increase its counter:
import "@acton/env"
import "@acton/io"
import "@acton/emulation/network"
import "@acton/emulation/scripts"
import "@contracts/types"
import "@wrappers/Counter.gen"

fun counterDeployValue(): coins {
    return env<coins>("COUNTER_DEPLOY_VALUE_NANOS") ?? 5000000;
}

fun explicitCounterAddress(): address? {
    return env("COUNTER_ADDRESS");
}

fun targetCounter(ownerAddress: address): Counter {
    val expected = Counter.fromStorage(Storage {
        id: 0,
        owner: ownerAddress,
        counter: 0,
    });
    val counterAddress = explicitCounterAddress();
    if (counterAddress == null) {
        return expected;
    }
    return Counter {
        address: counterAddress!,
        stateInit: expected.stateInit,
    };
}

fun main() {
    val delta = env<int>("COUNTER_DELTA") ?? 1;
    val deployer = scripts.wallet("deployer");
    val deployValue = counterDeployValue();
    val counterAddress = explicitCounterAddress();
    val counter = targetCounter(deployer.address);
    println("Deploy value: {}", deployValue);
    if (!scripts.isContractDeployed(counter.address)) {
        if (counterAddress != null) {
            println("Counter is not deployed at {}", counter.address);
            return;
        }
        counter.deploy(deployer.address, { value: deployValue }).waitForFirstTransaction();
    }

    println("Increasing counter by {}", delta);
    val res = counter.sendIncreaseCounter(deployer.address, delta);
    res.waitForFirstTransaction();

    println("Counter address: {}", counter.address);
    println("COUNTER_ADDRESS={}", counter.address);
    println("Current counter value: {}", counter.currentCounter());
}
To run the script:
acton script contracts/scripts/increase.tolkOutput:
$ acton script contracts/scripts/increase.tolk
Deploy value: 5000000
Increasing counter by 1
Counter address: kQD...tVe (Counter)
COUNTER_ADDRESS=kQD...tVe (Counter)
Current counter value: 1
This command emulates the script in the local environment. Scripts can also be emulated against a live network state.
Fork network state locally
--fork-net resolves live account and contract state from a network while keeping execution local — no transactions are broadcast:
acton script contracts/scripts/deploy.tolk --fork-net testnetIt is strongly recommended to verify scripts with --fork-net before executing them on a real network.
Run a script against a real network
If the --net flag is passed, all messages sent by net.send() and net.sendExternal() will be applied to the real network. Use this only after configuring a funded wallet and confirming the local emulation path works.
acton script contracts/scripts/increase.tolk --net testnetSee the deployment guide for more.
Set up a wallet
Deployment to testnet or mainnet requires a funded wallet. Use acton wallet to create one and request testnet funds in a single step:
acton wallet new --name deployer --local --airdrop --version v5r1Output:
$ acton wallet new --name deployer --local --airdrop --version v5r1

✓ Wallet successfully created and added to wallets.toml
✓ Wallet address is EQB...m6n

✓ The mnemonic is securely stored in your system's keyring.
→ Requesting airdrop for wallet deployer EQB...m6n
→ Fetching PoW challenge...
→ Solving challenge (difficulty: 20 bits)...
✓ Challenge solved in 46.8ms
✓ Your claim has been queued. It will be processed soon.

NOTE: This is a testnet wallet. Testnet GRAM has NO VALUE.

To check wallet balances run acton wallet list --balance.
This creates a new wallet and saves its configuration to wallets.toml in the project root. By default, Acton stores the mnemonic in the system keyring when secure storage is available.
If secure storage is unavailable, or if disabled with --secure false, the mnemonic is written to wallets.toml. Never commit it to git. Acton adds it to .gitignore automatically.
The --airdrop flag automatically requests testnet funds from the configured faucet after the wallet is created.
Other useful acton wallet subcommands:
| Command | Purpose |
|---|---|
acton wallet new --name deployer --local --airdrop --version v5r1 | Create a Wallet V5 R1 wallet and request testnet funds |
acton wallet import --name deployer | Import an existing mnemonic |
acton wallet list --balance | List configured wallets and their on-chain balances |
acton wallet airdrop deployer --net testnet | Request testnet funds for an existing wallet |
acton wallet sign deployer --body <hex> | Sign an external message body without running a script |
acton wallet export-mnemonic deployer | Export the mnemonic interactively |
acton wallet remove deployer -y | Remove a wallet non-interactively |
See the wallet management guide and the acton wallet reference for more.
Use TON Connect
Pass --tonconnect to connect a wallet through the TON Connect protocol:
acton script contracts/scripts/deploy.tolk --net testnet --tonconnectActon saves the TON Connect session to build/sessions/tonconnect/<network>.json and reuses it on subsequent runs.
Debug script execution
Pass --verbose to print executor logs:
acton script contracts/scripts/deploy.tolk --net testnet --verbosePass --show-bodies to print decoded message bodies alongside each transaction in the output.
acton script contracts/scripts/deploy.tolk --net testnet --verbose --show-bodiesVerify the contract
Use acton verify to check that the deployed bytecode matches the local sources. It compiles local sources, uploads them to the verifier backend, collects the required signatures, and submits the verification transaction.
acton verify Counter --net testnet --address <CONTRACT_ADDRESS>Replace <CONTRACT_ADDRESS> with the address from the deployment step.
Verification requires a funded wallet. If there is more than one wallet, choose the target wallet when prompted. If there is a single wallet, it will be selected automatically.
Use --dry-run to compile and upload sources without consuming funds to send the verification message:
acton verify Counter --net testnet --address <CONTRACT_ADDRESS> --dry-runPass --tonconnect to approve the final verification transaction through a TON Connect wallet instead of a wallet from wallets.toml:
acton verify Counter --address EQDt7LL... --net mainnet --tonconnectActon starts a local TON Connect page and opens it in the browser. If the default page port is busy, pass --tonconnect-port <PORT>.
See the verification guide for more.
Manage on-chain libraries
The counter template does not need on-chain libraries, but larger contracts often use them to keep reusable code in a single masterchain account and reference it from many deployments. When a contract dependency in Acton.toml uses kind = "library_ref", publish that dependency first with acton library, then build and deploy the contracts that reference it.
Publish a configured contract as a library:
acton library publish <CONTRACT_NAME> --duration 365d --wallet deployer --net testnet --localActon compiles the contract, estimates the storage payment for the requested duration, sends the funding transaction, and saves the resulting metadata to libraries.toml. After publishing, inspect the library and top it up before storage fees run out. info and topup use the network saved in the library metadata:
acton library info <LIBRARY_NAME>
acton library topup <LIBRARY_NAME> --duration 1y --wallet deployer
To inspect code that is already on-chain, fetch it by hash:
acton library fetch <LIBRARY_HASH> --disasm --net testnetSee the on-chain libraries guide for the full publish, fetch, and library_ref workflow.
Miscellaneous AI-friendly commands
In addition to commonly used commands like acton test, AI agents can also benefit from special commands that query data, look up reference documentation, or collect diagnostic information.
Agent skills
Acton provides several development skills for AI agents to help browse the documentation, use commands, maintain the project layout, write idiomatic Tolk code, and run safety checks.
See the agent skills overview for more.
Inspect remote state
Use acton rpc to query remote blockchain account and contract state via TON Center APIs:
acton rpc info <CONTRACT_ADDRESS> --net testnetFetch the latest masterchain block sequence number with rpc block-number:
acton rpc block-number --net testnetRender a transaction trace as a decoded tree with rpc trace:
acton rpc trace <TX_HASH> --net testnetLook up TVM instructions
Use acton doc tvm to look up TVM reference instruction documentation:
acton doc tvm PUSHINT_8Add --find to fuzzy search instruction names and --description to also match descriptions, tags, and operands:
acton doc tvm --find --description "stack push"Diagnose the environment
Use acton doctor to print a diagnostic report covering resolved paths, manifest status, standard library health, overlay status, native library metadata, and relevant environment variables:
acton doctorRun this command and fix discovered issues before filing a bug report.
Next steps
- Testing guide — deep dive into writing comprehensive tests.
- Acton's Tolk libraries
- CLI commands reference
- Linting rules reference
Last updated on